

UPDATE:
There is another tutorial:
![]() → Set Up SSL/TLS Certificates for a Local Network
→ Set Up SSL/TLS Certificates for a Local Network
Covering setting up SSL/TLS certificates on local network if you don't have control of a public domain name.
What are SSL/TLS certicates?
A SSL/TLS certificate is a digital document used in internet commuication that authenticates that entities are really who they are. It is encrypted with the private key of the certication authority (CA) and the public key of the holder. Contrary to common belief, it is not the protocol that handles encryption. How it works is beyond the scope of this lesson. If you are interested, you can read more about how it works with this excellent video:
![]() → YouTube: How Certificates Actually Work
→ YouTube: How Certificates Actually Work
Setting up a certicate for your website shows visitor that you are not an inpersonator. It also enables traffic between your website and the visiting client to be encrypted. It is indicated by the https:// prefix for your URL and the padlock icon in most modern browser.
In this lesson, we will be using Let's Encrypt. The demo here uses MacOS but it should works on variants of Linux as well.
Prerequisites
Note that this only works if you:
- have control of the server that is running your website. For example, in a development environment. This will work also if you are running virtual machines on Cloud platforms such as Cloudflare or AWS.
- have control of a public domain (e.g. example.com)
Step 0: Install Package Manager
If you don't already have HomeBrew installed, install it by heading to HomeBrew and copy and paste the intall command into your terminal.
→ Go to Home Brew Install
If you are using an older version of MacOS, such as Catalina, use MacPorts to install it instead:
→ Go to MacPorts Install
Step 1: Install Certbot
Using HomeBrew:
brew install certbot
Using MacPorts:
sudo port install certbot
Step 3: Generate the Certificates
Now you will run a temporary local certificate authority that will "issue" your certificate and keys.
You have two options here. If you are actually running it on the machine that is listening to port 80 of the domain name, you can use:
sudo certbot certonly --auto -d [you-domain-name]
(If you use that command but not on the machine that is listening to port 80, you will get an error message.)
If you are running on another machine, especially behind a firewall from your remote web server, use:
sudo certbot certonly --manual -d [you-domain-name] preferred-challenges dns
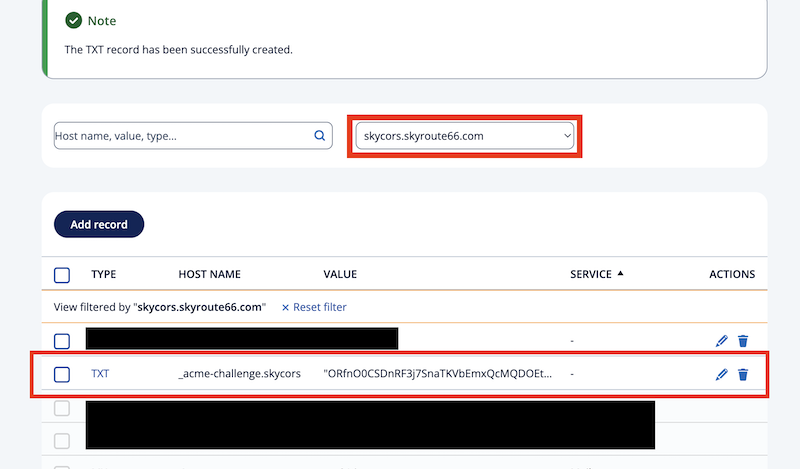
Now, you will have to prove that you actually own that domain. So Certbot gives you a challenge. It will ask you to set up a TXT record under that domain name.
In this example I am setting up skycors.skyroute66.com as the domain.
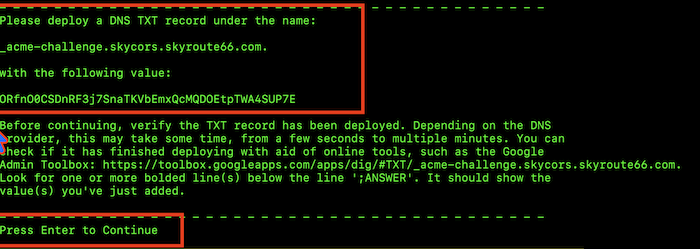
You will have to go to your ISP provider to do this. So it looks somethnig like this. Depends on your ISP provider.
After you go back to your terminal and press ENTER, you should have some files generated for you:
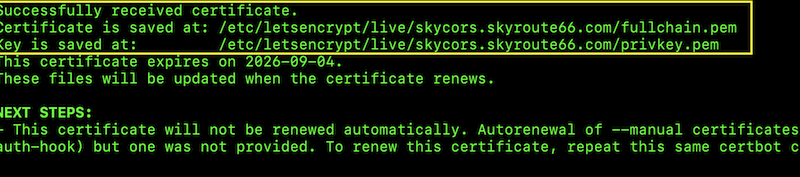
You can delete that TXT record after this step. It was only used to prove that you own the domain. Similar to a text messages with a one time code for 2-factor log in.
Note that it reminds you that you need to manually renew your certificate before it expires in 90 days.
Step 4: Use your Certificate to Host Your Site
Now it is time to tell your webserver to use your certificate and private key using the locations given in the previous step.
In this example, we are using Express Server.
https
.createServer(
    {
        key:  fs.readFileSync('/etc/letsencrypt/live/skycors.skyroute66.com/privkey.pem'),
        cert: fs.readFileSync('/etc/letsencrypt/live/skycors.skyroute66.com/fullchain.pem'),
        ca:   fs.readFileSync('/etc/letsencrypt/live/skycors.skyroute66.com/fullchain.pem')
    },
    app
)
.listen(443, () => { console.log("Server started, HTTPS listening on 443" )})
Step 5 (Optional) Have a Dedicated User:
The above code won't work without admin privilege (using sudo). That's because the certicate and the key files are in a protected diretory and can only be read by adminstrators.
This can pose a problem if you are using a process manager like pm2 because starting a process with a user without admin privilege will not be able to read these files.
You would want to copy these files to another location and authorize the user who runs the webserver or the process to read them.
Use this sequence of commands or enter them in a script file.
#!/bin/zsh

mkdir certs
chmod 755 ./certs
sudo cp /etc/letsencrypt/live/skycors.skyroute66.com/fullchain.pem ./certs
sudo cp /etc/letsencrypt/live/skycors.skyroute66.com/privkey.pem ./certs
sudo chown username:staff ./certs/*.pem
chmod 644 ./certs/*.pem
Be sure you substitute your domain name and destination directory (I am simply using a subdirectory certs here).
Now you will want to use these locations in your server instead. Again, using an Express JS example:
https
.createServer(
    {
        key:  fs.readFileSync('certs/privkey.pem'),
        cert: fs.readFileSync('certs/fullchain.pem'),
        ca:   fs.readFileSync('certs/fullchain.pem')
    },
    app
)
.listen(443, () => { console.log("Server started, HTTPS listening on 443" )})
Now when you go to your web browser and type https://[your domain name]. You should see either padlock or some other indication that the connection is secure!
Note that if you type something like https://[your domain name] or https://127.0.0.1:3000 the browser we say that the connection is not secure because now the domain name does not match the one on the certificate. This is expected behavior.
And you are done! Congratulations!