

What are SSL/TLS certicates?
A SSL/TLS certificate is a digital document used in internet commuication that authenticates that entities are really who they are. It is encrypted with the private key of the certication authority (CA) and the public key of the holder. Contrary to common belief, it is not the protocol that handles encryption. How it works is beyond the scope of this lesson. If you are interested, you can read more about how it works with this excellent video:
![]() → YouTube: How Certificates Actually Work
→ YouTube: How Certificates Actually Work
Setting up a certicate for your website shows visitor that you are not an inpersonator. It also enables traffic between your website and the visiting client to be encrypted. It is indicated by the https:// prefix for your URL and the padlock icon in most modern browser.
In a previous tutorial:
![]() → Set Up an SSL/TLS Certificate for Your Website
→ Set Up an SSL/TLS Certificate for Your Website
We covered how to set up SSL/TLS certicates if you have control of a public domain. What if you just want to set it up for your local development workstation or a few machines on your local network? Certbot cannot generate certificates for domain such as localhost or mydomain.local. This is where mkcert shines brightly. It is a no configuration, local certicate authority for your development environment.
The demo here uses MacOS but it should works on variants of Linux as well. We will also demostrate how to deploy to iOS, iPadOS, and Android devices.
Prerequisites
Note that this only works if you:
- have administrative privilege on the machines you work on.
- have a website served on a webserver (such as Apache or NGINX that you can use for testing the setup.
Step 0: Install Package Manager
If you don't already have HomeBrew installed, install it by heading to HomeBrew and copy and paste the intall command into your terminal.
→ Go to Home Brew Install
If you are using an older version of MacOS, such as Catalina, use MacPorts to install it instead:
→ Go to MacPorts Install
Step 1: Install mkcert
Using HomeBrew:
brew install mkcert
Using MacPorts:
sudo port install mkcert
Step 3: Setup the Local Certificate Authority (CA)
mkcert -install
You will be prompted for the adminstrator password. This will allow your machine to issue self-signed certificates.
The result will smiliar like this:

You can simply ignore the warning for now.
You can run this command to find out where your local CA is installed:
mkcert -CAROOT

If you go to that directory (be sure to display hidden files and folders), you will find two files there:
rootCA-key.pem is your private key. NEVER share this file. Leave it alone.
rootCA.pem is the root certificate of your local CA. You can rename or move this file if you want. We will revisit this later if you are setting up for multiple machines. Do not move or rename these files otherwise mkcert will not find them next time.
Step 4: Generate the Domain Certificate for your local machine
The syntax for generating certificate is:
mkcert domainname domainname ipaddress ipaddress ...
You will want to include localhost, ::1, 127.0.0.1, and the IP address of your machine.
If you have a hosts file set up for a local DNS server, you can include the domain name as well
For example:
mkcert testdomain.local localhost 127.0.0.1 ::1 localhost
The result will look similar to this:
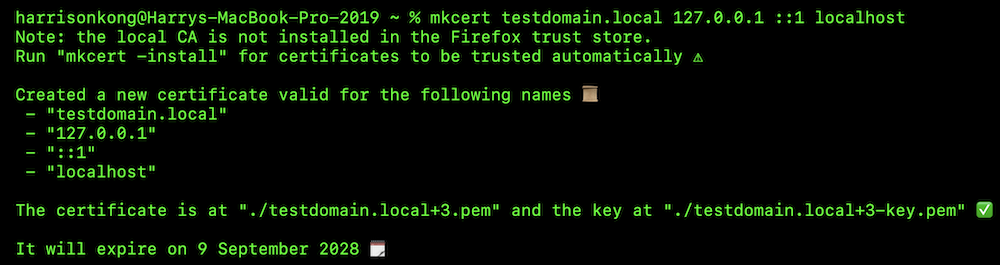
As it suggests, you will find your certificate file and the public key file in the same directory. Move these to a central location that is convenient for you. You will use these to start your web server or other server processes so they can be sent to the client machines for validation in the next step.
Note that it reminds you that you need to manually renew your certificate before it expires in 90 days.
Step 5: Use the Certificate for Your Webserver
I am providing examples for using NGINX and Apache webservers here. If you use others, you will need to find the instructions on how to use your certicate with them.
NGINX
The configuration file is located at
/usr/local/etc/nginx/nginx.conf
Open it in a text editor of your choice and scroll to near the bottom: to find this section:
    # HTTPS server
    #
    #server {
    #   listen       443 ssl;
    #   server_name  localhost;
    #
    #   ssl_certificate      cert.pem;
    #   ssl_certificate_key  cert-key.pem;
    #
    #   ssl_session_cache    shared:SSL:1m;
    #   ssl_session_timeout  5m;
    #
    #   ssl_ciphers  HIGH:!aNULL:!MD5;
    #   ssl_prefer_server_ciphers  on;
    #
    #   location / {
    #       root   html;
    #       index  index.html index.htm;
    #   }
    #}
    #include servers/*;
Uncomment the section by taking out the # signs at the beginning of each line. If you are using an IDE, try to select the entire block, then press Cmd-/ or Alt-/.
Subsitute the localhost with your domain name. Replace the cert.pem and cert-key.pem with the paths and names of the files you generated and moved in the previous step.
Now it should looks something like this (with your own values, of course):
    # HTTPS server

    server {
       listen       443 ssl;
       server_name  testdomain.local;

       ssl_certificate      /Users/administrator/certs/testdomain.local+3.pem;
       ssl_certificate_key  /Users/administrator/certs/testdomain.local+3-key.pem;

       ssl_session_cache    shared:SSL:1m;
       ssl_session_timeout  5m;

       ssl_ciphers  HIGH:!aNULL:!MD5;
       ssl_prefer_server_ciphers  on;

       location / {
           root   html;
           index  index.html index.htm;
       }
    }
    include servers/*;
Remember your values will be different!
Now stop and restart NGINX:
sudo nginx -s stop
sudo nginx
Go to the browser and type https://your-domain-name, your browswer should now be showing the connection as secure and encrypted.
Apache
Find the location of your configuration file and find this section:
<VirtualHost *:443>
    ServerName www.yourdomain.com
    DocumentRoot /var/www/html

    # Enable SSL Engine
    SSLEngine on

    # Paths to your certificate files
    SSLCertificateFile /etc/ssl/certs/your_domain_name.crt
    SSLCertificateKeyFile /etc/ssl/private/your_domain_name.key
    SSLCertificateChainFile /etc/ssl/certs/intermediate.crt
</VirtualHost>
Substitue your domain name for the entry ServerName. Substitute your file paths and locations from the previous step for the entries SSLCertificateFile and SSLCertificateKeyFile. Add a # to the entry SSLCertificateChainFile. Your certicate is self-signed and does not have a chain file.
So it might look something like this:
<VirtualHost *:443>
    ServerName testdomain.local
    DocumentRoot /var/www/html

    # Enable SSL Engine
    SSLEngine on

    # Paths to your certificate files
    SSLCertificateFile /Users/administrator/certs/testdomain.local+3.pem
    SSLCertificateKeyFile /Users/administrator/certs/testdomain.local+3-key.pem
    # SSLCertificateChainFile /etc/ssl/certs/intermediate.crt
</VirtualHost>
Remember your values will be different!
Restart your server:
sudo systemctl restart apache2
Go to the browser and type https://your-domain-name, your browswer should now be showing the connection as secure and encrypted.
Step 6: (Optional) Setting up for Multiple Machines On the Same Network
The certificate that you set up is only good for verifying connections on the same machine. If you want other machines to be able to connect to your machine security over the local network, you will have to install your root certificate on them.
You don't need to do this for most websites on the Internet because the root certificates of the major certificates authorities, such as Google are already pre-installed on your machine. Here, you are basically setting up your private authority.
Locate the root certificate of your machine. Remember you can use the command:
mkcert -CAROOT
to find the location if you haven't moved it.
Make a copy this file. Note that you are copying the certificate file. Its default name is rootCA.pem. Not the private key files (default name rootCA-key.pem). The private key file should NEVER be shared.
You might want to rename this copy so that it does not conflict with rootCA.pem of the target machine and you can tell which machine they come from.
Be careful not to rename the rootCA.pem of the target machine or the one that is still on the original machine. Otherwise, the next time you create another certificate, mkcert will not find it.
Now move this file to the root certificate of the target machine, then, on the target machine, run this command:
sudo security add-trusted-cert -d -r trustRoot -k /Library/Keychains/System.keychain path-to-the-origin-machine-root-cert
Examaple:
sudo security add-trusted-cert -d -r trustRoot -k /Library/Keychains/System.keychain /Users/harrisonkong/Library/Application Support/mkcert/workstation1-rootCA.pem
Now from this target machine, when you go to a browser and open up the webpage served by the host machine, it should show the connection as secure and encrypted.
If you want machines to cross trust each other, you will have to repeat step 3, 4, and 5 on every machine.
Step 7 (Optional) Deploy to iOS or iPadOS devices:
ATTENTION: On iOS and iPadOS only Safari browser will honor locally generated certificates. For example, if you are using Chrome for iOS, you can still view the web content but the browser will mark the site as Insecure.
Locate the root certiciate you wish to install.
Remember you can use
mkcert -CAROOT
If you haven't move it.
Airdrop to the target device if you are using a Mac. Otherwise, email it to yourself as an attachment and tap to download from the mobile device.
Install the file:
- Go to Settings > General > VPN & Device Management.
- Check if there is a downloaded mkcert profile waiting.
- Tap it, select Install in the top right, enter your passcode if prompted, and confirm.
Enable full SSL trust:
- Open the Settings app on your ios device.
- Navigate to General > About.
- Scroll to the very bottom and tap Certificate Trust Settings.
- Look under the Enable full trust for root certificates section.
- Locate your mkcert root CA and toggle the switch to ON.
Test the connection with the mobile device's browser.
And you are done! Congratulations!
Step 8 (Optional) Deploy to Android devices:
Locate the root certiciate you wish to install.
Remember you can use
mkcert -CAROOT
If you haven't move it.
- Download the certificate: save the root certificate file directly to your phone's Download folder from your web browser or cloud drive.
- Open Security Settings*: Open your device Settings app. The exact path depends on your phone's brand:
- Google Pixel / Stock Android: Go to Security & privacy > More security settings > Encryption & credentials.
- Samsung Galaxy: Go to Security and privacy > More security settings (or Other security settings) > Encryption and credentials.
- Install from Storage: Tap Install a certificate (or Install from device storage) and select CA certificate from the available list (which may also include Wi-Fi or VPN options).
- Accept the Warning: Review the security warning and select Install Anyway.
- Select the File: Use the built-in file explorer to navigate to your Downloads folder and select the certificate file.
- Name the Certificate: Give the certificate a recognizable name and tap OK.
Test the connection with the mobile device's browser.
And you are done! Congratulations!